
GA tracking code is required to collect data of users’ behaviour and then send it to Google Analytics. And in Magento we have two ways on how to add Google Analytics Tracking Code to the website to be able to track your visitors’ preferences – we are describing both ways in this article.
Take a look at the first manner of adding the GA tracking code.
1. Log in to the admin panel and then open System -> Configuration tab in the top menu:

3. Next step is to enter your Google Analytics tracking code to the Account Number field and set Enable option to Yes to display Google Analytics Tracking Code on the website’s pages.
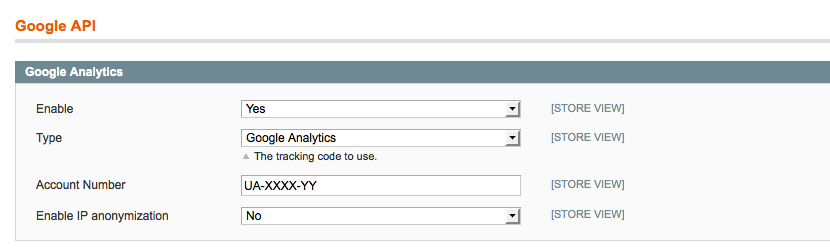
4. Click on the Save Config button to save these changes.
5. Moreover, you can always check if everything works correctly by opening the Page Source on the homepage of your website. So, you should see something like this:
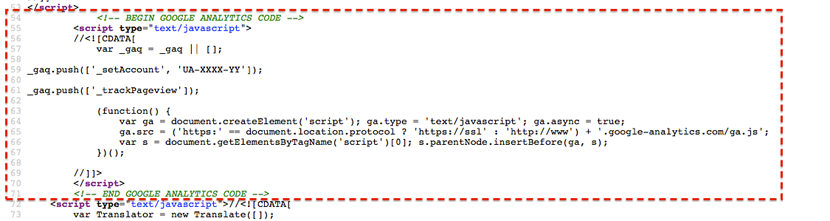
6. As a result – if you have the same information that means you’ve handled this task successfully. In case of some other result, try to clear the cache to see the latest changes.
This solution is quite easy and it allows to add Google Analytics Tracking Code without special knowledges. However, the drawback of this option is that Magento outputs GA Tracking Code in the old format of Google API (you can find more information about the first method by the following link:
https://developers.google.com/analytics/devguides/collection/gajs/).
<script type="text/javascript">

 var _gaq = _gaq || [];
 _gaq.push(['_setAccount', 'UA-XXXXX-X']);
 _gaq.push(['_trackPageview']);

 (function() {
   var ga = document.createElement('script'); ga.type = 'text/javascript'; ga.async = true;
   ga.src = ('https:' == document.location.protocol ? 'https://ssl' : 'http://www') + '.google-analytics.com/ga.js';
   var s = document.getElementsByTagName('script')[0]; s.parentNode.insertBefore(ga, s);
 })();

</script>
Proceeding our topic, Google suggests using new Google API for Analytics Tracking Code of your web store (https://developers.google.com/analytics/devguides/collection/analyticsjs/):
<!-- Google Analytics -->
<script>
(function(i,s,o,g,r,a,m){i['GoogleAnalyticsObject']=r;i[r]=i[r]||function(){
(i[r].q=i[r].q||[]).push(arguments)},i[r].l=1*new Date();a=s.createElement(o),
m=s.getElementsByTagName(o)[0];a.async=1;a.src=g;m.parentNode.insertBefore(a,m)
})(window,document,'script','//www.google-analytics.com/analytics.js','ga');

ga('create', 'UA-XXXX-Y', 'auto');
ga('send', 'pageview');

</script>
<!-- End Google Analytics -->
But the question is how to add this new Tracking Code without special knowledges? So, we’ve prepared the instruction for such cases as well.
In the beginning, we should mention that Google has the same requirements for placing the new version of Google Analytics Tracking Code as for the old one – it must be placed before the tag. Please follow these steps:
1. Firstly, make sure that the option Enable is set to No in the section Google API. Also, we recommend you to leave the field Account Number empty (as shown on the screenshot below) to avoid any unpredictable issues:

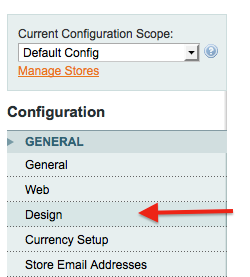
2. Go to System -> Configuration in the admin panel.
3. And there, in the left column, open the menu Design in the General section.
4. Then choose the HTML Head option in the section Design.
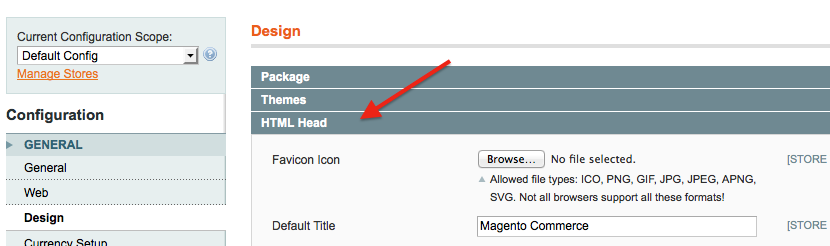
5. On the next step we will need Miscellaneous Scripts option. Add the below code to this section:
<!-- Google Analytics -->
<script>
(function(i,s,o,g,r,a,m){i['GoogleAnalyticsObject']=r;i[r]=i[r]||function(){
(i[r].q=i[r].q||[]).push(arguments)},i[r].l=1*new Date();a=s.createElement(o),
m=s.getElementsByTagName(o)[0];a.async=1;a.src=g;m.parentNode.insertBefore(a,m)
})(window,document,'script','//www.google-analytics.com/analytics.js','ga');

ga('create', 'UA-XXXX-Y', 'auto');
ga('send', 'pageview');

</script>
<!-- End Google Analytics -->
Where UA-XXXX-Y is the track-code of your shop.
6. The result you can see on the screenshot:

7. On the last step, save the changes, clear the cache and check if everything is customized correctly.
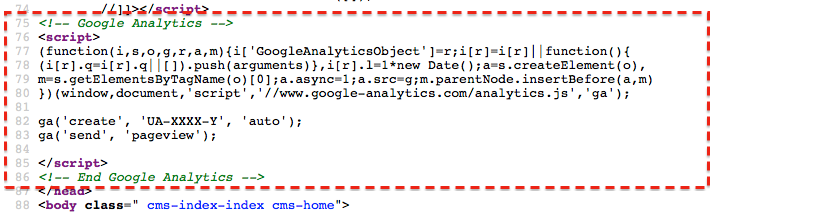
For this, go to the main page of your website, open Page Source, and check the code where is written </head>. Here is the example on what you should finally see:
Of course, to simplify your work with GA Tracking code you can use our free module. Here is the link to download it:
http://www.magentocommerce.com/magento-connect/google-universal-analytics-3.html
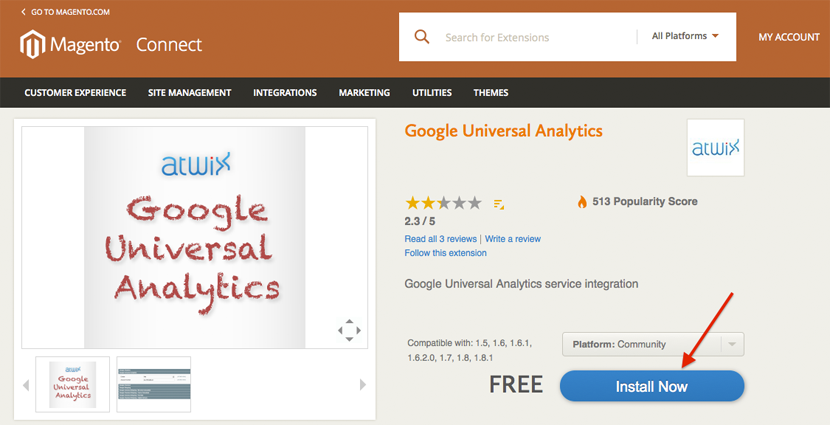
1. Download the module (if you have already installed it with Magento Connect Manager, you can go directly to the 10th step).
2. Once the module is downloaded, click on Install now button as it is shown on the picture below:
3. Register or log in (if you have already created a user).
4. After joining the system you will be redirected to the page from second step, where you need to click on Install button again.
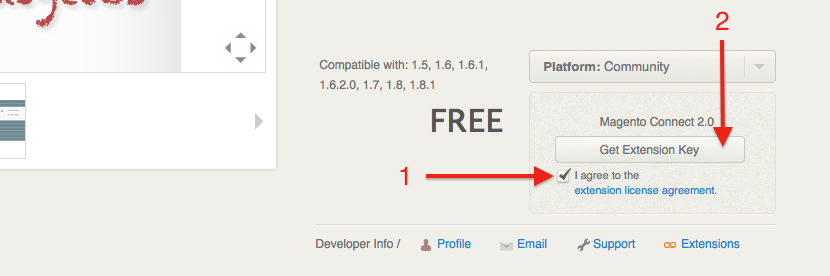
5. Choose I agree to the extension license agreement and press the button Get Extension Key.
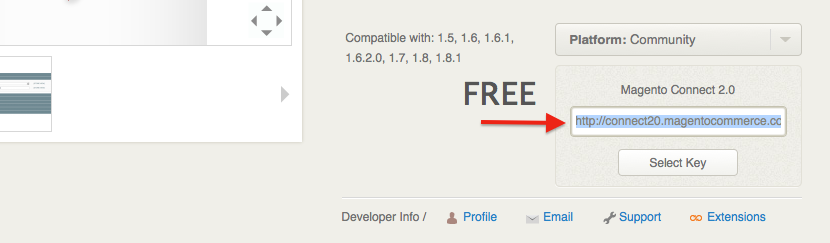
6. After that you will receive Module Extension Key, which you should copy into the buffer.
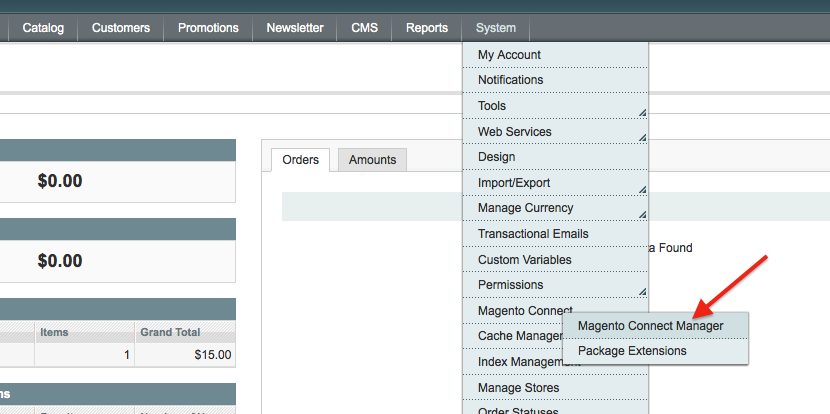
7. Go to the admin panel and open System -> Magento Connect -> Magento Connect Manager:
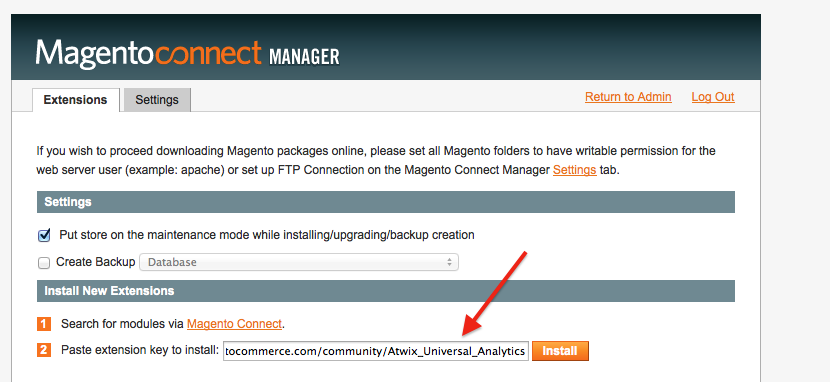
8. The further step is to insert the copied Module Extension Key into the Paste extension key field and press the button Install.
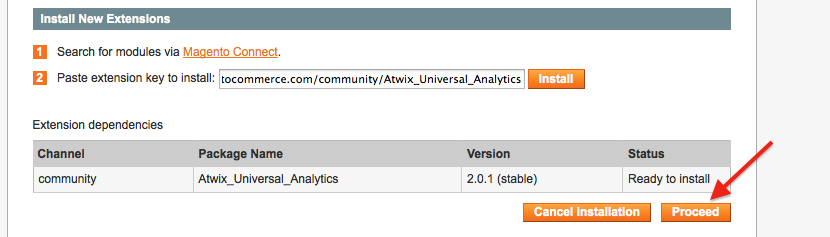
9. Also, confirm the process of installation by clicking on the button Proceed.
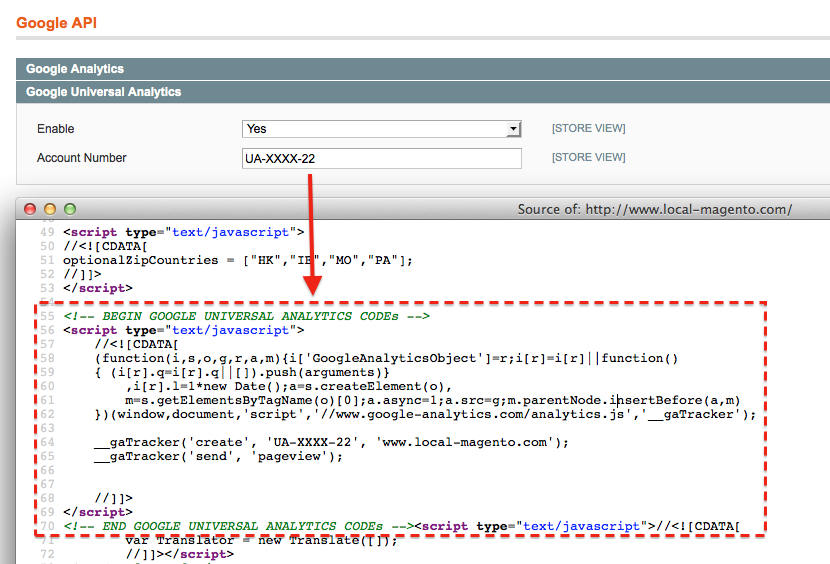
10. Your Google Analytics Tracking Code should be inserted after the module’s installation – go to System menu and open the menu Google API in the Sales section:
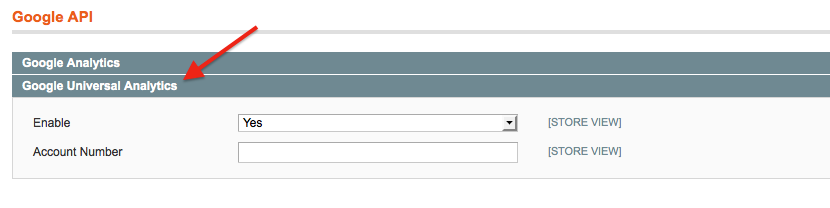
11. After all, insert your Google Analytics Tracking Code into Account Number field, choose Yes for the option Enable and save the changes.
The result of all this is that Google Analytics Tracking Code will be shown on the website.
Therefore, we think now you have much information about how to add Google Analytics Tracking Code to the website – just choose the most convenient way for you.
You may also want to read: