
We are going to talk about event system approach in development. The event is a very flexible way to extend application logic. This approach is actual in both Magento 1 and Magento 2. Let’s go ahead and check how it works.
The observer pattern
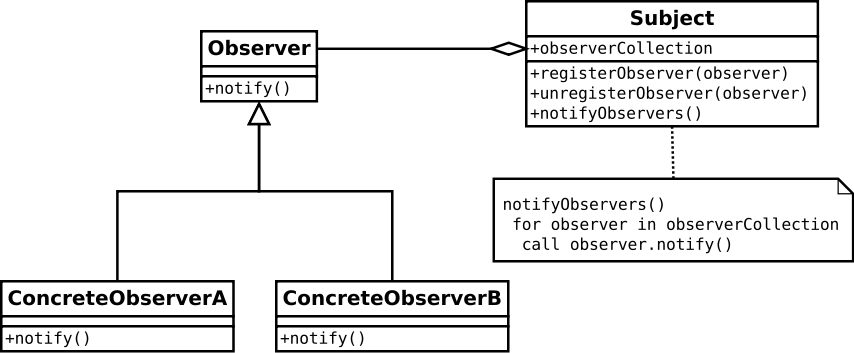
The main conception of the event system is the same as the good old observer programming pattern. Here is a UML diagram of the pattern:
Usually, the pattern is represented by two entities: Observer and Subject. The Observer entity is responsible for the Subject notifications handling: it can listen to the Subjects notifications and perform some action when the notification has been occurred. And the Subject is responsible for the Observer notifications: it encapsulates information about Observers that have been registered and informs them when the notification has been fired.
It was general information for understanding how the pattern works. Magento event system uses a unique key called “event” for events identification. So, we are going to investigate how it actually works.
Magento 1.x
In case of Magento 1.x, if we want to review an example of the event system we need to create an observer model and register it for an event observing. Let’s try this by creating a simple route logging logic. Init a basic structure of the Magento 1.x module like this:

Then, create the “Model” directory and the Observer.php file there, just like on the screenshot above. On the next step, fill in the newly created files by code. In config.xml we should declare the model section and register observers for the event listening.
<?xml version="1.0"?>
<config>
   <modules>
       <Atwix_Observer>
           <version>1.0.0.0</version>
       </Atwix_Observer>
   </modules>
   <!-- global area -->
   <global>
       <!-- declare the models for the Magento factories -->
       <models>
           <atwix_observer>
               <class>Atwix_Observer_Model</class>
           </atwix_observer>
       </models>
       <!-- declare observer for all of the requests -->
       <events>
           <!-- event name -->
           <controller_action_predispatch>
               <observers>
                   <!-- unique name of the observer in this event node -->
                   <atwix_observer>
                       <!-- the alias of the observer class  -->
                       <class>atwix_observer/observer</class>
                       <!-- the name of the public method -->
                       <method>logAllRequests</method>
                   </atwix_observer>
               </observers>
           </controller_action_predispatch>
       </events>
   </global>
   <!-- adminhtml area -->
   <adminhtml>
       <!-- declare observer for the adminhtml of the requests -->
       <events>
           <!-- event name -->
           <controller_action_predispatch>
               <observers>
                   <!-- unique name of the observer in this event node -->
                   <atwix_observer>
                       <!-- the alias of the observer class  -->
                       <class>atwix_observer/observer</class>
                       <!-- the name of the public method -->
                       <method>logAdminhtmlRequests</method>
                   </atwix_observer>
               </observers>
           </controller_action_predispatch>
       </events>
   </adminhtml>
   <!-- frontend area -->
   <frontend>
       <!-- declare observer for the frontend of the requests -->
       <events>
           <!-- event name -->
           <controller_action_predispatch>
               <observers>
                   <!-- unique name of the observer in this event node -->
                   <atwix_observer>
                       <!-- the alias of the observer class  -->
                       <class>atwix_observer/observer</class>
                       <!-- the name of the public method -->
                       <method>logFrontendRequests</method>
                   </atwix_observer>
               </observers>
           </controller_action_predispatch>
       </events>
   </frontend>
</config>
Take a look at one of the <events> nodes. There are three<events> child nodes that were placed into different areas: global, adminhtml and frontend.
<config>
   <!-- global area -->
   <global>
       <!-- declare observer for the all of the requests -->
       <events>
	<!-- ... -->
        </events>
   </global>
   <!-- adminhtml area -->
   <adminhtml>
       <!-- declare observer for the adminhtml of the requests -->
       <events>
<!-- ... -->
       </events>
   </adminhtml>
   <!-- frontend area -->
   <frontend>
       <!-- declare observer for the frontend of the requests -->
       <events>
           <!-- ... -->
       </events>
   </frontend>
</config>
The areas specify where the observers will be fired up:
- adminhtml – when something happens in the admin panel
- frontend – when something happens on the frontend (storefront)
- global – when something happens in the admin panel and storefront
We have declared our own observers in all areas to see the difference in those actions. Let’s find out how to declare an observers in Magento 1.x. Observers should be registered in the <events> node. Here is a code snippet from our config.xml:
<config>
   <!-- frontend area -->
   <frontend>
       <!-- declare observer for the frontend of the requests -->
       <events>
           <!-- event name -->
           <controller_action_predispatch>
               <observers>
                   <!-- unique name of the observer in this event node -->
                   <atwix_observer>
                       <!-- the alias of the observer class  -->
                       <class>atwix_observer/observer</class>
                       <!-- the name of the public method -->
                       <method>logFrontendRequests</method>
                   </atwix_observer>
               </observers>
           </controller_action_predispatch>
       </events>
   </frontend>
</config>
As you can see, we should declare an event’s name that we are going to observe. In our case, the event name is controller_action_predispatch . We have created the <controller_action_predispatch> node that nested inside of the <events> node.
Then we register the observers by declaring information about each of them inside of the <observers> node. Note that the child nodes of the <observer> node should be unique. Since Magento merges all configuration files into a new one by fully qualified XPaths, we need to avoid a situation when another module overrides our observer by declaring a node with the same name in the <observers> section. We can use the following nodes to create an observer:
- <class> – the alias of model that should be used as an observer is specified there. That is why we have declared model alias in the beginning of the chapter.
- <method> – the public method of the model that have been declared at the <class> node is specified there.
Also, we have a possibility to use <type> node to specify the model type or disable the observer. This node can be equal to the following values:
- singleton – the model will be called as a singleton via Mage::getSingleton() method.
- model or object – the model will be called as usual model via Mage::getModel().
- disabled – this option disables the whole observer.
In addition, if you want Magento call your observer as a singleton you can remove the <type> node.
That’s all about observers declaration in Magento 1.x. Now, let’s implement the observer itself for events handling. Observer.php:
class Atwix_Observer_Model_Observer
{

   /**
    * Get route name by the Varien_Event_Observer object
    *
    * @param Varien_Event_Observer $observer
    * @return bool|string
    */
   protected function _getRouteByObserver(Varien_Event_Observer $observer)
   {
       //  interaction with event data
       //  we can write $this instead of using $observer
       if ($observer->hasControllerAction()) {
           $controllerAction = $observer->getControllerAction();
           $request = $controllerAction->getRequest();

           return $request->getRequestUri();
       }

       return false;
   }

   /**
    * Log all of the requests
    *
    * @param Varien_Event_Observer $observer
    */
   public function logAllRequests(Varien_Event_Observer $observer)
   {
       $route = $this->_getRouteByObserver($observer);
       if ($route) {
           Mage::log($route, null, 'global.log', true);
       }
   }
   /* Other methods of the class */
}
We have added the full listing of Observer.php at the end of the article. The observer in Magento 1.x is just a class that may have no parent class (as it is in our example), it encapsulates the event handlers logic.
Now we want to look deeper into the Atwix_Observer_Model_Observer::logAllRequests() method. This method expects the $observer parameter. All methods of the observer can be called using $observer variable – an instance of the Varien_Event_Observer class. This parameter also contains all information about the event that has been fired. The Varien_Event_Observer class simply extends the Varien_Object functionality. So, we can get an information about the event by calling magic methods like in the example above. Also, we are able to get the information about the event by using this variable:
class Atwix_Observer_Model_Observer
{
   /* another code */
   protected function _getRouteByObserver()
   {
       if ($observer->hasControllerAction()) {
	// using the $this instead of $observer
           $controllerAction = $this->getControllerAction();
           $request = $controllerAction->getRequest();

           return $request->getRequestUri();
       }

       return false;
   }
   /* another code */
}
Proceeding with our topic, we describe how Magento 1.x fires the events and executes the observers. Magento needs to be notified that some event has been fired and it uses the Mage::dispatch() method for this purpose. Let’s see how it looks in the code for controller_action_predispatch event example:
Mage::dispatchEvent('controller_action_predispatch', array('controller_action' => $this));
If more detailed, the first parameter of Mage::dispatchEvent() is a string that represents the event name. We should use this name to declare our observers for the event and help Magento find the necessary observers. In our case, the event name is “controller_action_predispatch” and we use this name for the observer declaration.
The second parameter is an associative array that represents the event data. Using this parameter we can access the event’s information. So, we will be able to use an information about the controller action that has fired the event. Moreover, we can create our own custom event using Mage::dispatch(). In this case, the observing flow will be implemented in a standard way. That’s all about the event system in Magento 1.x.
Magento 2
Magento 2 provides new ways for the code customisation. However, the event system is still actual and the main concept of the event system is almost the same but with some minor changes. We want to review how to work with the event system in Magento 2 and for this we create the same route logging logic as it was in Magento 1.
First of all, we should init the basic structure of our module like this:

Then, for observing the events we need to declare our observer, and note that the way of the observer’s declaring has been changed in Magento 2. There is no more big config.xml files in Magento 2 and the configuration is divided into the single small xml files instead. Declare the observers and event in the event.xml file, you can see that file in our module on the screenshot above. Also, in the new Magento version we have an efficient configuration loading related to different areas. All of the areas are represented as folders in the etc directory and it’s possible to specify the event.xml configuration for the following areas:
- adminhtml – the configuration will be applied for admin panel.
- frontend – the configuration will be applied for storefront.
- crontab – the configuration will be applied for the Magento CRON actions.
- webapi_rest – the configuration will be applied when Magento is used as a REST application.
- webapi_soap – the configuration will be applied on SOAP calls.
All of the configuration files that are placed in the etc folder are used in the global area. The global configurations are loaded before area-specific configurations and override them. Take a look at the screenshot above, there are two directories in the etc folder: adminhtml and frontend. They represent admin and frontend areas respectively. Also, there is the events.xml file in every of the declared areas and we are going to declare observers for every of those areas. Also, we will create events.xml configuration in the global area to investigate it.
Let’s check how the observers should be declared in events.xml:
<?xml version="1.0"?>
<config xmlns:xsi="http://www.w3.org/2001/XMLSchema-instance" xsi:noNamespaceSchemaLocation="urn:magento:framework:Event/etc/events.xsd">
   <event name="controller_action_predispatch">
       <observer name="atwix_event_global" instance="Atwix\Event\Observer\Logger\GlobalLogger" shared="true" />
   </event>
</config>
The events configuration starts with the <config> node. The attributes specify the XML schema definition that should validate the nodes nested inside of <config>. And the <event> nodes are nested inside of the <config> node. In our case, we have subscribed the controller_action_predispatch event in the same way as in Magento 1.x. In the <event> node we have observers declarations and the node can contain the following attributes:
- name – the required attribute that identifies the node. It should be unique to prevent the node overriding.
- instance – the required attribute that specifies the full name of the class that should be subscribed to the event notifications.
- shared – the optional attribute that specifies the way of the class creation. If this option isn’t specified (or it has “false” as a value), the class will be created every time when the event has been fired. Otherwise, the class will be “shared” between events firing: it will be created just once and saved to cache.
- disabled – the optional attribute that gives an ability to disable the observer if it is specified as “true”.
So, we have declared our observers. Now let’s check how the observer should be implemented:
<?php

namespace Atwix\Event\Observer\Logger;

use Magento\Framework\Event\ObserverInterface;
use Magento\Framework\App\Request\Http;
use Psr\Log\LoggerInterface;

class GlobalLogger implements ObserverInterface
{
   protected $_logger;

   public function __construct(
       LoggerInterface $logger
   )
   {
       $this->_logger = $logger;
   }

   public function execute(\Magento\Framework\Event\Observer $observer)
   {
       /** @var Http $request */
       $request = $observer->getRequest();
       $fullName = $request->getPathInfo();

       $this->_logger->info('Global: ' . $fullName);

       return $this;
   }
}
Pay attention that there is one important requirement: all observers should implement the \Magento\Framework\Event\ObserverInterface interface. According to this, there should be only one observing logic placed in the ObserverInterface::execute() method. All further logic is similar to Magento1.x, the method gets all information about the event from parameters. There is one parameter – an object of the \Magento\Framework\Event\Observer class. It can return the event information using the magic methods as it’s shown in the example for Magento 1.x.
At last, how does Magento 2 fire the events? As you may remember, the Mage_Core_Model_App::dispatchEvent() method was responsible for the event firing in Magento 1.x. And in case of Magento 2 the event firing is more complex, all the event managers should be implemented from Magento\Framework\Event\ManagerInterface:
interface ManagerInterface
{
   /**
    * Dispatch event
    *
    * Calls all observer callbacks registered for this event
    * and multiple observers matching event name pattern
    *
    * @param string $eventName
    * @param array $data
    * @return void
    */
   public function dispatch($eventName, array $data = []);
}
Below you can see the event firing logic for Magento\Framework\Event\Manager::dispatch() method:
class Manager implements ManagerInterface
{

   /**
    * @param InvokerInterface $invoker
    * @param ConfigInterface $eventConfig
    */
   public function __construct(InvokerInterface $invoker, ConfigInterface $eventConfig)
   {
       $this->_invoker = $invoker;
       $this->_eventConfig = $eventConfig;
   }

   public function dispatch($eventName, array $data = [])
   {
       $eventName = mb_strtolower($eventName);
       foreach ($this->_eventConfig->getObservers($eventName) as $observerConfig) {
           $event = new \Magento\Framework\Event($data);
           $event->setName($eventName);

           $wrapper = new Observer();
           $wrapper->setData(array_merge(['event' => $event], $data));

           $this->_invoker->dispatch($observerConfig, $wrapper);
       }
   }
}
Summing it up, the manager class delegates the configurations processing and observer is delegating the responsibilities to the implementations of ConfigInterface and InvokerInterface interfaces accordingly. Also, it’s possible to fire custom events in Magento 2 as well as it is in Magento 1.x. For this, just inject the event manager to your class and call the dispatch() method of the manager when the event should be fired. Here is an example:
class SomeClass
{
   public function __construct(ManagerInterface $eventManager)
   {
      // inject the event manager
      $this->_eventManager = $eventManager;
   }

   public function someMethod()
   {
       // here is the event should be fired
      $this->_eventManager->dispatch(‘my_event’, array(‘context’ => $this));
   }
}
The Magento extension for DPD shipping developed by Atwix highlights how custom solutions can provide advanced features like parcel tracking, delivery options, and pricing rules to enhance operational efficiency and customer satisfaction.
You can find those modules on GitHub:
Source of the module for Magento 1.x on GitHub
Source of the module for Magento 2 on GitHub
Feel free to share your feedback or ask questions in the comments. Thank you for reading us.