Ok, you have installed OroCRM, configured your development environment, worn headphones with your favourite music and still don’t know what to start with… Let us help you a bit.
One of the most usual thing you will face with during your development for OroCRM (and not only) is the navigation menu items. If you are going to have a separate page with grid or something else, you need a link to this page. OroCRM has a global navigation menu which consists of tabs on the top level and menu items under the tabs with different depth. You are able to add your own tab as well as new menu items.
As you may know, OroCRM is based on Symfony 2 framework. It means if you need to make some modification or your own extension – you have to create a new bundle. In SF2 bundle is a structural and functional part of the web application. Roughly, Symfony2 framework as well as Oro platform is a set of different bundles for different purposes. Herewith, if you need a feature – you need a bundle.
First of all, we need to create our own bundle. Fortunately, Symfony has a built in the console which allows to automate different actions including a bundle creation. Let’s create a new bundle named AtwixTestBundle. So, open console, go to your project root and type:
php app/console generate:bundle --namespace=Atwix/Bundle/TestBundle
On the next step, you will be asked to enter the bundle name. Just hit enter button, the default bundle name will be AtwixTestBundle. Then, the system asks you to enter target directory. There’s no need to change the value from the default one. Hit enter again. After this, the system needs to know what configuration format will be used for the bundle:
Configuration format (yml, xml, php, or annotation):
Type ‘yml’ and press the enter button. Then say ‘no’ when asked for generation of the whole directory structure and ‘yes’ to confirm the bundle generation on the next step. The last two steps on a bundle generation are automatic Kernel and Routing update. It’s important to enter ‘no’ on these steps since Oro platform has a bit different way for bundle integration, which will be described later. The system might throw the following error at the end:
The command was not able to configure everything automatically.

You must do the following changes manually.
But don’t be afraid, it’s ok. Now, you should see a new set of files and directories in the src/Atwix/Bundle/TestBundle directory.
Next, we need to register and create our own controller for rendering our template or some other actions (depends on what are you going to develop). Go to src/Atwix/Bundle/TestBundle/Controller and create the DemoController.php file there with the following content:
<?php

// src/Atwix/Bundle/TestBundle/Controller/DemoController.php

namespace Atwix\Bundle\TestBundle\Controller;

use Symfony\Bundle\FrameworkBundle\Controller\Controller;

use Sensio\Bundle\FrameworkExtraBundle\Configuration\Route;

use Sensio\Bundle\FrameworkExtraBundle\Configuration\Template;

use Sensio\Bundle\FrameworkExtraBundle\Configuration\ParamConverter;

/**
* @Route("/demo")
*/

class DemoController extends Controller
{
   /**
    * @Route("/test", name="atwix_demo_test")
    * @Template("AtwixTestBundle:Test:index.html.twig")
    */
   public function testAction()
   {
       return array();
   }
}
As you can see, we have a couple of comments here, which are named annotations in the Symfony Framework and allow to connect different parameters (depends on the class type) to a class/method. In our case, we initialise the route name as “/demo” and the action name as “/test” using annotations. Also, we are connecting a template to our controller’s action – index.html.twig . Create the template file in src/Atwix/Bundle/TestBundle/Resources/views/Test/:
{# src/Atwix/Bundle/TestBundle/Resources/views/Test/index.html.twig #}

{% extends 'OroUIBundle:actions:index.html.twig' %}
{% import 'OroUIBundle::macros.html.twig' as UI %}
{% block content %}
   Here will be a content
{% endblock content %}
As you may guess, we need to extend our template from the standard UIBundle to use platform UI elements on our page.
Ok, now we have our own controller and the template, let’s create a menu item. As we have mentioned before, we need to integrate our bundle to the OroCRM platform. For this purpose, we are going to tell the system that our new bundle should be connected to the OroCRM. Go to src/Atwix/Bundle/TestBundle/Resources/config and create a directory named ‘oro’. Then, create two files with the following contents in this directory:
# src/Atwix/Bundle/TestBundle/Resources/config/oro/bundles.yml

bundles:
   - { name: Atwix\Bundle\TestBundle\AtwixTestBundle, priority: 90 }
and
# src/Atwix/Bundle/TestBundle/Resources/config/oro/routing.yml

atwix_test_bundle:
   resource:     "@AtwixTestBundle/Controller"
   type:         annotation
   prefix:       /atwix
Using the first file, we register our bundle in the system, and using the second file we configure routing for our bundle, particularly, set controller path, routes prefix and routing type.
The final step is a config file creation to determine our new menu items. Go to src/Atwix/Bundle/TestBundle/Resources/config/ and create the navigation.yml file there:
# src/Atwix/Bundle/TestBundle/Resources/config/navigation.yml

oro_menu_config:
   items:
       atwix_tab:
           label: Atwix
           uri: '#'

       shortcut_test_item:
           label: Atwix Test
           route: atwix_demo_test

   tree:
       application_menu:
           children:
               atwix_tab:
                   children:
                       shortcut_test_item: ~
In the global menu configuration oro_menu_config we create two new items: atwix_tab and shortcut_test_item. Then, we connect shortcut_test_item to our tab using tree configuration node. We have almost done, except few ‘finishing combos’. Now, we need to clear the cache and ask the system to rebuild the navigation menu. Using console, go to your project root directory and type the following two commands there:
php app/console cache:clear

php app/console oro:navigation:init
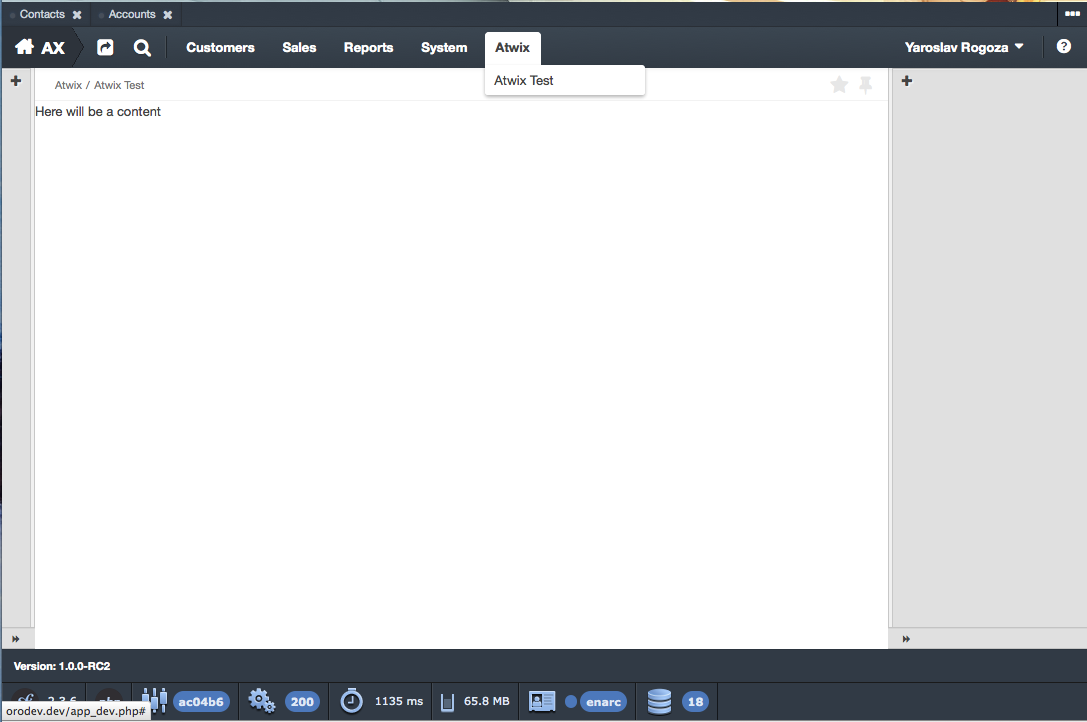
That’s it. You should see new navigation menu tab and newly created item:
In our next articles we are going to describe how to create new entities, manipulate with grids etc.. So, if you think that we have a lack of some details in this article – hope you will find them in the next articles. Also, feel free to ask your questions in the comments.

