As you know, the possibility to schedule and execute some operations automatically in the background – it is a very important feature almost for all web applications. It allows to configure the system to check for the new updates, to make some maintenance operations, like logs cleaning, to run the synchronization processes between different systems etc. OroCRM has a built-in CRON daemon that gathers all CRON jobs from all the installed extensions and runs them in a scheduled time. The process of adding a new CRON job is quite easy.
First of all, you need to configure the built-in CRON daemon. And if you haven’t done it yet, log in to your server using SSH in order to access the server’s CLI (Command Line Interface). Using the CLI execute the following command:
sudo crontab -e
After this, you will have opened a text editor with a list of all CRON jobs registered in the system. On this stage, at the very end of the file, add the following line:
*/1 * * * * /usr/bin/php [oro_crm_root_dir]/app/console --env=dev oro:cron >> /dev/null
where oro_crm_root_dir – it’s an absolute path to your OroCRM installation. The first part (*/1 * * * *) means that OroCRM CRON daemon needs to be polled every minute by server’s CRON daemon. The –env=dev parameter tells OroCRM for what environment it should be executed: dev (development) or prod (production). If you are configuring CRON for production environment, you should have this parameter as –env=prod.
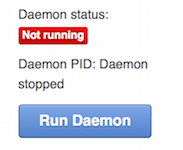
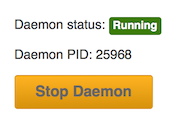
Then, we need to enable CRON daemon inside of OroCRM (JMSJobQueue) – go to System -> Jobs Queue and check the daemon’s status in the upper right corner.
If it’s “Not Running” then click on the “Run Daemon” button – the daemons’s status should be changed to “Running”.
The next step is to create a new CRON job in your custom extension. For this purpose, you need to create a new directory in your extension’s (bundle’s) root named ‘Command’. Inside of this directory, create a new class that will be a definition of your new CRON job. Basically, the file’s content should be similar to the following one:
<?php

namespace Atwix\Bundle\TestBundle\Command;

use Symfony\Component\Console\Input\InputInterface;
use Symfony\Component\Console\Output\OutputInterface;
use Symfony\Bundle\FrameworkBundle\Command\ContainerAwareCommand;

use Oro\Bundle\CronBundle\Command\CronCommandInterface;

class OroCronTestCommand extends ContainerAwareCommand implements CronCommandInterface
{
    const COMMAND_NAME   = 'oro:cron:oro-cron-test';

    /**
     * {@inheritdoc}
     */
    public function getDefaultDefinition()
    {
        return '*/1 * * * *';
    }

    /**
     * Console command configuration
     */
    public function configure()
    {
        $this
            ->setName(self::COMMAND_NAME)
            ->setDescription('OroCRM test CRON job');
    }

    /**
     * Runs command
     *
     * @param  InputInterface  $input
     * @param  OutputInterface $output
     *
     * @throws \InvalidArgumentException
     * @return int|null|void
     */
    public function execute(InputInterface $input, OutputInterface $output)
    {
        $output->write("Hello world");
    }
}
Moreover, it’s necessary to extend this class from ContainerAwareCommand and implement from CronCommandInterface.
Also, make sure that your class have a ‘..Command’ word at the end of the class name and the file’s name as well.
COMMAND_NAME defines your CRON job name. It’s required to have ‘oro:cron’ in the very beginning of the CRON job’s name.
And getDefaultDefinition() method returns a scheduled time for the current job. Inside of the configure() method you can define a name and a description of the job.
Finally, inside of the execute() method you need to put the commands which should be executed upon the CRON job execution. Note that we do not recommend you to put tons of your code inside of this method. Instead of that, it’s a very good practice to create a new class, define it as a service and put your business logic there. In our next articles we are going to describe how to do that in details.
P.S. In case of OroCRM, patience is a very powerful tool. Good luck ;)


