The OroCRM platform provides us with an opportunity to create our own dashboard. We can remove unnecessary data from the dashboard, change the position of widget blocks, and if we can not find necessary widgets, we can create our own ones. The process of creating a widget is not hard. In this blog post we will describe the process of creating a custom widget and add a widget to the dashboard.
Our future widget will be able to add and show simple notes in the grid. The OroCRM provides few really convenient ways to work with notes. There are simple ways to note different entities like Accounts, Contacts … and others, but we can not use it on the dashboard. We will use the part of native OroNoteBundle.
First we need to create a bundle or we can use an existing one. For the purpose of better understanding we will create a new bundle – AtwixWidgetDashboardBundle.
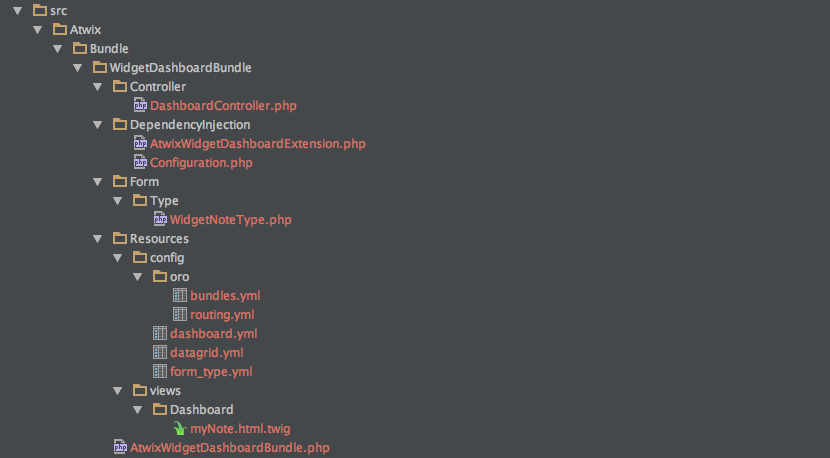
Below you can see the structure of AtwixWidgetDashboardBundle:

Now we will add the main files in order to allow the application to work with the bundle. So lets create folders and put files inside. We will put our bundle to the “src” folder:
<?php
//src/Atwix/Bundle/WidgetDashboardBundle/AtwixWidgetDashboardBundle.php
namespace Atwix\Bundle\WidgetDashboardBundle;

use Symfony\Component\HttpKernel\Bundle\Bundle;

class AtwixWidgetDashboardBundle extends Bundle
{
}
Then add config files. After that enable the bundle:
#src/Atwix/Bundle/WidgetDashboardBundle/Resources/config/oro/bundles.yml
bundles:
    - { name: Atwix\Bundle\WidgetDashboardBundle\AtwixWidgetDashboardBundle, priority: 100 }
And enable routing for the bundle:
#src/Atwix/Bundle/WidgetDashboardBundle/Resources/config/oro/routing.yml
atwix_widget_dashboard_bundle:
    resource:     "@AtwixWidgetDashboardBundle/Controller"
    type:         annotation
    prefix:       /atwix-dashboard
Next we need to add files from DependencyInjection:
<?php
// src/Atwix/Bundle/WidgetDashboardBundle/DependencyInjection/Configuration.php
namespace Atwix\Bundle\WidgetDashboardBundle\DependencyInjection;

use Symfony\Component\Config\Definition\Builder\TreeBuilder;
use Symfony\Component\Config\Definition\ConfigurationInterface;

/**
 * This is the class that validates and merges configuration from your app/config files
 *
 * To learn more see {@link http://symfony.com/doc/current/cookbook/bundles/extension.html#cookbook-bundles-extension-config-class}
 */
class Configuration implements ConfigurationInterface
{
    /**
     * {@inheritDoc}
     */
    public function getConfigTreeBuilder()
    {
        $treeBuilder = new TreeBuilder();
        $rootNode = $treeBuilder->root('atwix_widgetdashboard');

        // Here you should define the parameters that are allowed to
        // configure your bundle. See the documentation linked above for
        // more information on that topic.

        return $treeBuilder;
    }
}
And the other one:
<?php
// src/Atwix/Bundle/WidgetDashboardBundle/DependencyInjection/AtwixWidgetDashboardExtension.php
namespace Atwix\Bundle\WidgetDashboardBundle\DependencyInjection;

use Symfony\Component\DependencyInjection\ContainerBuilder;
use Symfony\Component\Config\FileLocator;
use Symfony\Component\HttpKernel\DependencyInjection\Extension;
use Symfony\Component\DependencyInjection\Loader;

/**
 * This is the class that loads and manages your bundle configuration
 *
 * To learn more see {@link http://symfony.com/doc/current/cookbook/bundles/extension.html}
 */
class AtwixWidgetDashboardExtension extends Extension
{
    /**
     * {@inheritDoc}
     */
    public function load(array $configs, ContainerBuilder $container)
    {
        $configuration = new Configuration();
        $config = $this->processConfiguration($configuration, $configs);

        $loader = new Loader\YamlFileLoader($container, new FileLocator(__DIR__.'/../Resources/config'));
        $loader->load('form_type.yml');
    }
}
We should create our custom controller and add few actions:
<?php
// src/Atwix/Bundle/WidgetDashboardBundle/Controller/DashboardController.php
namespace Atwix\Bundle\WidgetDashboardBundle\Controller;

use Symfony\Bundle\FrameworkBundle\Controller\Controller;
use Sensio\Bundle\FrameworkExtraBundle\Configuration\Route;
use Sensio\Bundle\FrameworkExtraBundle\Configuration\Template;
use Oro\Bundle\SecurityBundle\SecurityFacade;
use Oro\Bundle\CalendarBundle\Provider\CalendarDateTimeConfigProvider;
use Oro\Bundle\LocaleBundle\Model\LocaleSettings;
use Symfony\Component\HttpFoundation\Request;
use Symfony\Component\HttpFoundation\Response;
use Symfony\Component\HttpFoundation\JsonResponse;
use Oro\Bundle\NoteBundle\Entity\Note;

class DashboardController extends Controller
{

    /**
     * @Route(
     *      "/my_note/{widget}",
     *      name="atwix_widget_my_note",
     *      requirements={"widget"="[\w-]+"},
     *     options={"expose"=true}
     * )
     * @Template("AtwixWidgetDashboardBundle:Dashboard:myNote.html.twig")
     */
    public function myNoteAction($widget)
    {
        $form = $this->createForm('atwix_widget_note', null, []);

        $result = [
            'form' => $form->createView()
        ];

        $result = array_merge(
            $result,
            $this->get('oro_dashboard.widget_configs')->getWidgetAttributesForTwig($widget)
        );

        return $result;
    }

    /**
     * @Route(
     *      "/my_note_save",
     *      name="atwix_widget_my_note_save",
     *     options={"expose"=true}
     * )
     */
    public function myNoteSaveAction(Request $request)
    {
        $data = trim($request->request->get('widgetNotesData'));
        $user = $this->getUser();
        $token = $this->get('security.context')->getToken();
        $organization = $token->getOrganizationContext();

        if (is_null($data) ==! true) {
            $entity = new Note();
            $entity->setMessage($data);
            $entity->setOwner($user);
            $entity->setOrganization($organization);

            $em = $this->get('doctrine')->getManager();
            $em->persist($entity);
            $em->flush();

        }
        return new JsonResponse(
            ['successful' => true, 'message' => 'The Note was saved successful']
        );
    }

    /**
     * @Route(
     *      "/my_note_delate/{id}",
     *      name="atwix_widget_my_note_delete",
     *     requirements={"id"="\d+"},
     *     options={"expose"=true}
     * )
     */
    public function myNoteDeleteAction(Note $entity)
    {
        $em = $this->get('doctrine')->getManager();
        $em->remove($entity);
        $em->flush();
        return new JsonResponse(
            ['successful' => true, 'message' => 'The Note was deleted successful']
        );
    }
}
myNoteAction – creates form view and returns configs of the dashboard widget.
myNoteSaveAction – takes data from the form then prepares the data and saves new note to the database.
myNoteDeleteAction – the action removes unnecessary notes using the datagrid action.
Next step we add a form builder class. The note’s form will have only one text field and a button:
<?php
// src/Atwix/Bundle/WidgetDashboardBundle/Form/Type/WidgetNoteType.php
namespace Atwix\Bundle\WidgetDashboardBundle\Form\Type;

use Symfony\Component\Form\AbstractType;
use Symfony\Component\Form\FormBuilderInterface;
use Symfony\Component\Validator\Constraints\File;
use Symfony\Component\OptionsResolver\OptionsResolverInterface;
use Doctrine\ORM\EntityManager;


class WidgetNoteType extends AbstractType
{
    protected $em;

    public function __construct(EntityManager $em)
    {
        $this->em = $em;
    }

    /**
     * @param FormBuilderInterface $builder
     * @param array $options
     */
    public function buildForm(FormBuilderInterface $builder, array $options)
    {
        $builder->add(
            'note',
            'textarea',
            [
                'required' => false,
                'label'    => 'Add note',
                'attr' => [
                    'class' => 'atwix_widget_note_textarea'
                ]
            ]
        )
        ->add(
            'button',
            'button',
            [
                'label' => 'Save Note',
                'attr' => [
                    'id' => 'atwix_widget_note_button'
                ]
            ]
        );
    }

    /**
     * {@inheritdoc}
     */
    public function getName()
    {
        return 'atwix_widget_note';
    }
}
And call the form class as service:
#src/Atwix/Bundle/WidgetDashboardBundle/Resources/config/form_type.yml
parameters:
    atwix_widget_note.form.type.class: Atwix\Bundle\WidgetDashboardBundle\Form\Type\WidgetNoteType

services:
    atwix_widget_note.form.type.entity:
        class: %atwix_widget_note.form.type.class%
        arguments:
            - @doctrine.orm.entity_manager
        tags:
            - { name: form.type, alias: atwix_widget_note }
Also we add a template for our widget:
{# src/Atwix/Bundle/WidgetDashboardBundle/Resources/views/Dashboard/myNote.html.twig #}
{% extends 'OroDashboardBundle:Dashboard:widget.html.twig' %}
{% import 'OroDataGridBundle::macros.html.twig' as dataGrid %}

{% block content %}
    {{ form_widget(form) }}
    {{ dataGrid.renderGrid('widget-note-grid') }}
    <script type="text/javascript">
        require(['orocrm/call/info-opener']);
    </script>

    <script type="text/javascript">
        require(['jquery','oroui/js/mediator'],
            function($, mediator) {
                $('.my-widget-notes-widget-content').on("click", '#atwix_widget_note_button', (function(){
                    var text = $( '.atwix_widget_note_textarea textarea' ).val();
                    if (text != '') {
                        $.ajax({
                            url: Routing.generate('atwix_widget_my_note_save'),
                            type: 'POST',
                            data: {
                                widgetNotesData: text
                            },
                            success: function(result) {
                                if (result.successful == true) {
                                    $( '.atwix_widget_note_textarea textarea' ).val('');
                                    mediator.trigger('datagrid:doRefresh:widget-note-grid');
                                }
                            }
                        });
                    }

                }));
            }
        );
    </script>
{% endblock %}
Next we should add few configuration files:
#src/Atwix/Bundle/WidgetDashboardBundle/Resources/config/dashboard.yml
oro_dashboard_config:
    widgets:
        my_widget_notes:
            label:       oro.note.entity_plural_label
            route:       atwix_widget_my_note
            description: 'Simple adding notes from dashboard'
            icon:        bundles/orocalendar/img/my_calendar.png
The dashboard.yml file is used to configure dashboards and widgets that are shown on a dashboard. On our dashboard.yml we use minimum sections, the OroCRM allows you to use really flexible configuration of the widgets, but for our note widget it is unnecessary.
For the existing notes we will use datagrid. We can use table or list, but we think the grid is most convenient, because we have filters, paginations, sorting, and other actions. About OroCRM grids you can read in official documentations and some previous posts in our blog.
Add datagrid config:
#src/Atwix/Bundle/WidgetDashboardBundle/Resources/config/datagrid.yml
datagrid:
    widget-note-grid:
        source:
            type: orm
            query:
                select:
                    - noteEntity.id as id
                    - noteEntity.message as message
                    - noteEntity.createdAt as createdAt
                from:
                    - { table: %oro_note.entity.class%, alias: noteEntity }
                join:
                    inner:
                        - { join: noteEntity.owner, alias: ownerUser }
                where:
                    and:
                      - ownerUser.id = @oro_security.security_facade->getLoggedUserId
        columns:
            message:
                label: 'Note'
            createdAt:
                label:         oro.ui.created_at
                frontend_type: datetime
        sorters:
            columns:
                message:
                    data_name: message
                createdAt:
                    data_name: createdAt
            default:
                createdAt: DESC
        properties:
            delete_note:
                type:         url
                route:        atwix_widget_my_note_delete
                params:       [ id ]
        actions:
            delete:
                type:         ajax
                label:        oro.grid.action.delete
                icon:         trash
                link:         delete_note
        options:
            toolbarOptions:
                hide: true
                pageSize:
                    items: [5]
                    default_per_page: 5
That’s all. All classes and config files were added. Next we need to clear cache:
php app/console cache:clear
And run:
php app/console fos:js-routing:dump --target=web/js/routes.js
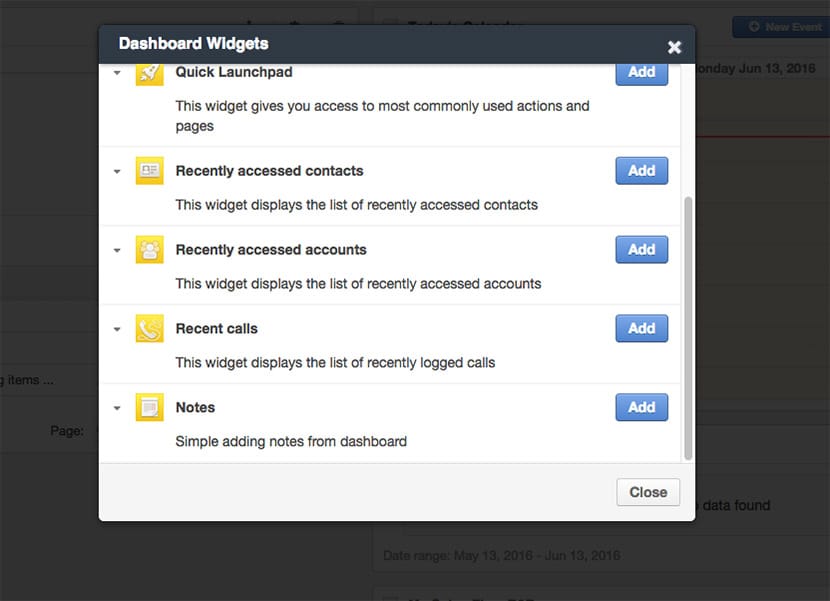
If you haven’t made a mistake and the files were properly added, you can add a new widget to the dashboard. Please click “Add widget” button on the dashboard and choose our Note widget.

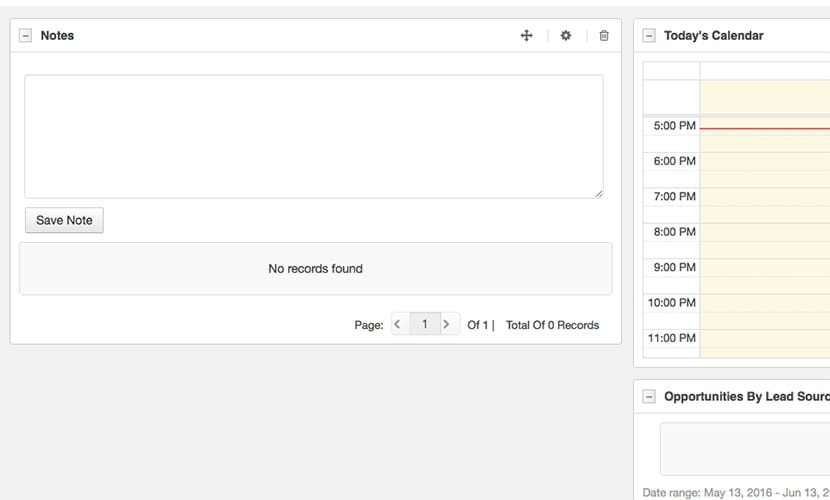
Now you can see the widget on the dashboard.

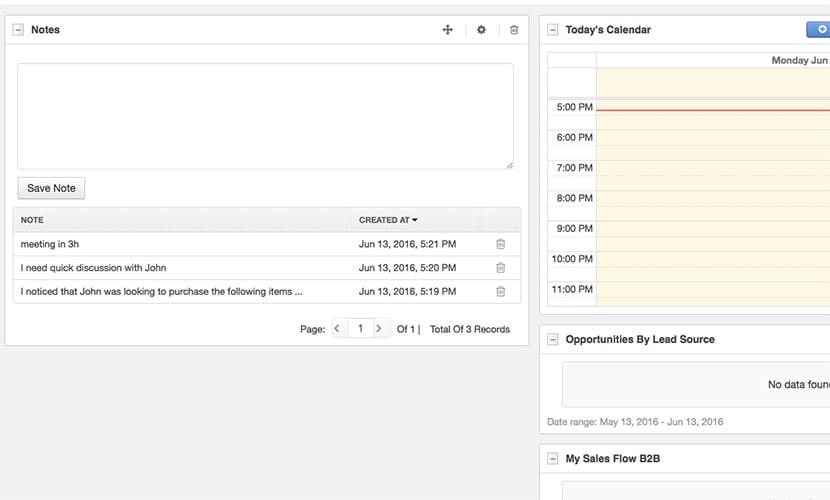
And add some data.

You can see that the process of adding a new widget is really easy. In this post, we added the helpful widget without loads of code. And now you can write quick notes directly from the dashboard. Also, check our article for adding simple notes to Magento.
