From time to time Magento developers face with a need to add settings for their extensions. As it’s hard to remember all necessary details for each setting, so we would like to share our snippets which contain xml code of the most recent settings used in Magento admin.
First of all, we would recommend you always place everything, that refers to Magento system settings, in the system.xml file, since it’s the main and the only role of this file.
If you need to create your own tab in the admin system settings, you should simply add the following lines to the file:
<config>
    <tabs>
        <atwix translate="label">
            <label>Atwix Extensions</label>
            <sort_order>150</sort_order>
        </atwix>
    </tabs>
</config>
As a result, you’ll get the new group (tab) in the admin settings. When you need to complete the procedure of adding settings you should add the following items: section, settings groups and the settings (fields) themselves:
<config>
    <sections>
        <atwix_shoppingbar translate="label" module="atwix_shoppingbar">
            <class>separator-top</class>
            <label>Shopping Bar</label>
            <tab>atwix</tab>
            <sort_order>130</sort_order>
            <show_in_default>1</show_in_default>
            <show_in_website>1</show_in_website>
            <show_in_store>1</show_in_store>
            <groups>
                <quicksearch>
                    <label>Quick search</label>
                    <frontend_type>text</frontend_type>
                    <sort_order>20</sort_order>
                    <show_in_default>1</show_in_default>
                    <show_in_website>0</show_in_website>
                    <show_in_store>1</show_in_store>
                    <fields>
                        <quicksearch_enabled translate="label comment">
                            <label>Enable Quick Search</label>
                            <comment><![CDATA[Enable quick search block]]></comment>
                            <frontend_type>select</frontend_type>
                            <source_model>adminhtml/system_config_source_yesno</source_model>
                            <sort_order>1</sort_order>
                            <show_in_default>1</show_in_default>
                            <show_in_website>0</show_in_website>
                            <show_in_store>1</show_in_store>
                        </quicksearch_enabled>
                        <results_count translate="label comment">
                            <label>Results count</label>
                            <comment><![CDATA[Quick search results count (min 1, max 20)]]></comment>
                            <frontend_type>text</frontend_type>
                            <sort_order>5</sort_order>
                            <show_in_default>1</show_in_default>
                            <show_in_website>0</show_in_website>
                            <show_in_store>1</show_in_store>
                        </results_count>
                    </fields>
                </quicksearch>
            </groups>
        </atwix_shoppingbar>
    </sections>
</config>
Here is an illustration what means each of these terms:

Next question is how will the different settings in the xml config look like. As you already know, each setting is placed in the <fields> node, then follows the unique setting’s id and finally – setting’s attributes. Here is a small review of the most useful settings:
Text field
Simple input field for short text values:
![]()
 <text_field translate="label">
    <label>Text Field</label>
    <frontend_type>text</frontend_type>
    <sort_order>10</sort_order>
    <show_in_default>1</show_in_default>
    <show_in_website>1</show_in_website>
    <show_in_store>1</show_in_store>
</text_field>
Textarea
Wide input field for long text values:

<textarea translate="label">
    <label>Textarea</label>
    <frontend_type>textarea</frontend_type>
    <sort_order>20</sort_order>
    <show_in_default>1</show_in_default>
    <show_in_website>1</show_in_website>
    <show_in_store>1</show_in_store>
</textarea>
Drop down with Yes/No values
Drop down menu with the values “Yes” and “No”. Commonly it is used as a flag for enabling/disabling something:
![]()
<enabled translate="label">
    <label>Enabled</label>
    <frontend_type>select</frontend_type>
    <source_model>adminhtml/system_config_source_yesno</source_model>
    <sort_order>1</sort_order>
    <show_in_default>1</show_in_default>
    <show_in_website>1</show_in_website>
    <show_in_store>1</show_in_store>
</enabled>
Drop down with Enable/Disable values
Almost the same as previous one, but instead of “Yes” and “No” you will get “Enable” and “Disable”:
![]()
<active translate="label">
    <label>Enable/Disable</label>
    <frontend_type>select</frontend_type>
    <sort_order>40</sort_order>
    <source_model>adminhtml/system_config_source_enabledisable</source_model>
    <show_in_default>1</show_in_default>
    <show_in_website>1</show_in_website>
    <show_in_store>1</show_in_store>
</active>
Drop down with custom values
Drop down with the custom set of values, generated by source model:
![]()
<default translate="label">
    <label>Select</label>
    <frontend_type>select</frontend_type>
    <!-- Source model for countries list. For custom list you need to use your own source model -->
    <source_model>adminhtml/system_config_source_country</source_model>
    <sort_order>50</sort_order>
    <show_in_default>1</show_in_default>
    <show_in_website>1</show_in_website>
    <show_in_store>1</show_in_store>
</default>
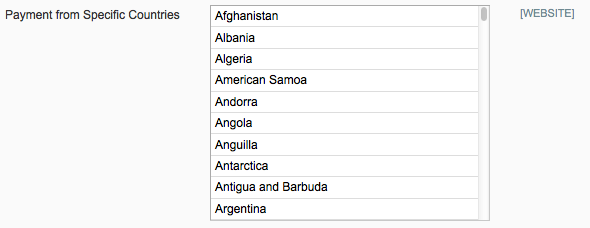
Multiselect with custom values
Field with the ability to select few items at the same time:

<multiselect translate="label">
    <label>Multiselect</label>
    <frontend_type>multiselect</frontend_type>
    <!-- Source model for countries list. For custom list you need to use your own source model -->
    <source_model>adminhtml/system_config_source_country</source_model>
    <sort_order>60</sort_order>
    <show_in_default>1</show_in_default>
    <show_in_website>1</show_in_website>
    <show_in_store>1</show_in_store>
    <can_be_empty>1</can_be_empty>
</multiselect>
File
Allows to choose a file for uploading. In this example the file will be saved in var/uploads directory:

<file translate="label comment">
    <label>File</label>
    <frontend_type>file</frontend_type>
    <backend_model>adminhtml/system_config_backend_file</backend_model>
    <upload_dir>var/uploads</upload_dir>
    <sort_order>70</sort_order>
    <show_in_default>1</show_in_default>
    <show_in_website>0</show_in_website>
    <show_in_store>0</show_in_store>
</file>
Time
Is used to create three drop down menus for setting up the hours, minutes and seconds respectively:
![]()
<time translate="label comment">
    <label>Time</label>
    <frontend_type>time</frontend_type>
    <sort_order>80</sort_order>
    <show_in_default>1</show_in_default>
    <show_in_website>1</show_in_website>
    <show_in_store>1</show_in_store>
</time>
Editable items list
Allows to add/remove text values for the setting:

<addresses>
    <label>Blocked Email Addresses</label>
    <frontend_model>atwix_emailblocker/adminhtml_addresses</frontend_model>
    <backend_model>adminhtml/system_config_backend_serialized</backend_model>
    <sort_order>90</sort_order>
    <show_in_default>1</show_in_default>
    <show_in_website>1</show_in_website>
    <show_in_store>1</show_in_store>
    <can_be_empty>1</can_be_empty>
</addresses>
Heading
Is used to entitle some settings inside the group:

<heading translate="label">
    <label>Heading</label>
    <frontend_model>adminhtml/system_config_form_field_heading</frontend_model>
    <sort_order>90</sort_order>
    <show_in_default>1</show_in_default>
    <show_in_website>1</show_in_website>
    <show_in_store>1</show_in_store>
</heading>
Dependent field
It can be any field. The main purpose of this one – it’s to hide/show the field depending on the state of some other field. In the following example the field depends on the field’s enablemethod state. If enablemethod value is 1 – dependent_field will appear and vice versa:
<dependent_field translate="label">
    <label>Dependent Field</label>
    <frontend_type>textarea</frontend_type>
    <sort_order>100</sort_order>
    <show_in_default>1</show_in_default>
    <show_in_website>1</show_in_website>
    <show_in_store>1</show_in_store>
    <depends>
        <enablemethod>1</enablemethod>
    </depends>
</dependent_field>
There is also one interesting cheat. You are able to use javascript inside of the <comment></comment> node:
<specificerrmsg translate="label">
    <label>Displayed Error Message</label>
    <frontend_type>textarea</frontend_type>
    <comment>
    <![CDATA[
        <script type="text/javascript">
            Event.observe('carriers_flatrate_active', 'change', function() {
                alert('Be careful with this one');
            })
        </script>
    ]]>
    </comment>
    <sort_order>2013</sort_order>
    <show_in_default>1</show_in_default>
    <show_in_website>1</show_in_website>
    <show_in_store>1</show_in_store>
</specificerrmsg>
It might be useful for changing field’s value depending on different credentials. We would not recommend you to use it very often there, especially for the big javascript code.
Moreover, as you might have noticed, there are some attributes like source_model for the custom drop downs or, all the more so, frontend model for editable list which may disappoint a bit. We are going to describe how to operate with these models in our next article, which will see the light in the nearest future. Thank you for reading us :)
