In this post we want to share our expertise on how to manage translations in Magento. We will cover various methods, their priorities and characteristics. We will show you the pros and cons of each solution to match your needs when you change or add a new translation to your online store.
As you may know, Magento has 3 different ways of adding/changing translations (from highest to lowest priority):
1. Inline Translation
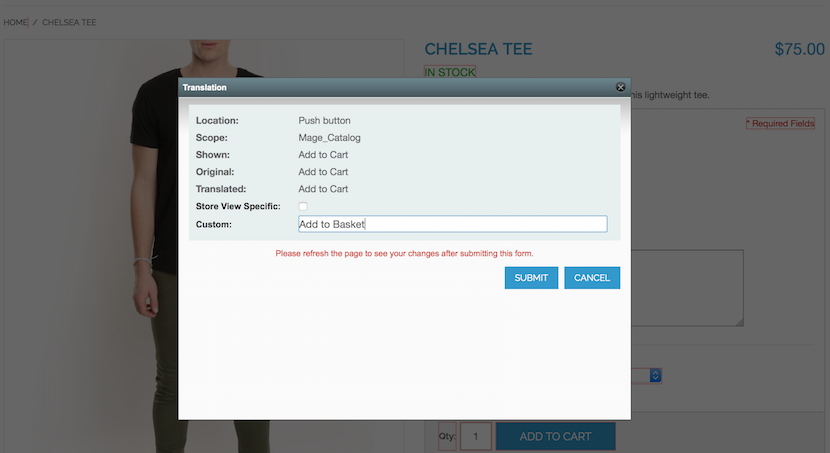
All changes (new translations) that are added via this method will be stored in the database (core_translate table). We can enable the Inline Translation for frontend or/and backend from the admin panel by System -> Configuration -> Developer -> Translate Inline. With the Inline Translation method we have the ability to add a new translation to the Default Config (all stores) or to a specific store view. You may notice that the overridden string (original translation) has the following format – Module_Name::Original_Translation. It happens because you add the changes to a specific place (specific module), moreover the same string can appear in a different module.
Let’s see the example of changing the translation for the Add to Cart button on the product page. The following popup helps you add a new string:

According to these changes you can see the following data in the “core_translate” table.

2. Theme translation
This method helps you add a translation only to a specific theme. This change will require a minor Magento theme development. All changes are stored in the CSV file with the following path:
For example, for the “modern” theme in the default package and for the English (US) locale we have the following path:
Note that some strings can be translated many times in different modules, so it is better to translate the Add to Cart button using the Module_Name::string (the same syntax as described for the Inline Translation method).
For example, if we want to change the QTY string on the cart page for the default theme, RWD package and English (US) locale, we should add this line:
"Mage_Checkout::Qty", "Mage_Checkout::Item Qty"
to the file with app/design/frontend/rwd/default/locale/en_US/translate.csv path.
3. Module translations
Translation with this method is applied to Default Config (all stores) and stored within:
For example, below you can see the path to the module translation file for the Mage Catalog module:
Once in a while we need to change some translations of the core or a third party module. Editing files in this case is always a bad practice. So, we should add changes in another way. Let’s see which of the methods is more suitable for us.
Inline Translation
Pros: it’s easy to add a new translation (you don’t have to know a lot about translations in Magento to make these changes, and it is non-technical), it can be applied as a default value (for all stores) or to a specific store view.
Cons: when you have a lot of changes it may take much time, and it can be difficult to apply to other Magento stores.
Theme translation
Pros or Cons (depends on your needs): it applies only to the theme where you add changes. It’s the best solution for making changes in a current/specific theme only. And it is the worst when you have many themes for your store/websites/devices and you need to make the same changes everywhere.
Module translation
Pros: it’s a good way to add a translation file to your own module, the core, or a third party module.
Cons: it’s harder to use than the Inline Translation :)
When you create your own module, you can declare and add a translation file to it. Let’s consider the situation when we need to add changes to the core or a third party module. When we need to edit the translation in a specific module – the best way to do it is to add an additional translation file to that module in which you want to change the translation and declare it in your module configuration file in the following way:
<area>
  <translate>
    <modules>
      <module_name>
        <files>
          <node_name>New_file_name.csv</node_name>
        </files>
      </module_name>
    </modules>
  </translate>
</area>
Also, try to change the “Add to Cart” in the Mage Catalog module. We can do this in our own module’s (Atwix_Catalog) configuration file (app/code/local/Atwix/Catalog/etc/config.xml):
<config>
  ...
  <frontend>
    <translate>
      <modules>
        <Mage_Catalog>
          <files>
            <additional_file>Atwix_Catalog.csv</additional_file>
          </files>
        </Mage_Catalog>
      </modules>
    </translate>
  </frontend>
</config>
In this way, we added another translation file to the module. The translation files will be merged, so don’t forget to add dependancies to the initialization file for your module when it’s necessary, otherwise your changes may not take effect.
Therefore, now we can add our changes to the Atwix Catalog translate file (app/locale/en_US/Atwix_Catalog.csv):
"Add to Cart","Add to Basket"
And we will see the results after clearing cache.
Hope we have clearly described all translation methods and this information will help you understand the difference and improve your store. Feel free to share your thoughts and questions in comments below.
