In this article we would like to show you how to add a new custom category attribute in Magento 1. For doing this in Magento 2, read this post. Let’s say, this attribute is needed to display some content on the category page.
First of all, we need to create a new module for adding custom category attribute, we will call it “Custom Category Attribute”.
Step 1. Create a new custom Magento 2 module.
We should let Magento know about our new module. Initial configuration file is located in ‘app/etc/modules/Atwix_CustomCategoryAttribute.xml’.
Atwix_CustomCategoryAttribute.xml
<?xml version="1.0"?>
<config>
    <modules>
        <Atwix_CustomCategoryAttribute>
            <active>true</active>
            <codePool>community</codePool>
        </Atwix_CustomCategoryAttribute>
    </modules>
</config>
It means that the module is active and it is located in the community code pool.
Step 2. Configure module.
Module configuration file is located in ‘app/code/<code pool>/<name space>/<module name>/etc’ and its name is config.xml – note, that in our case this looks like ‘ app/code/community/Atwix/CustomCategoryAttribute/etc/config.xml’.
config.xml
<?xml version="1.0"?>
<config>
    <modules>
        <Atwix_CustomCategoryAttribute>
            <version>0.0.1</version>
        </Atwix_CustomCategoryAttribute>
    </modules>

    <global>
        <resources>
            <add_category_attribute>
                <setup>
                    <module>Atwix_CustomCategoryAttribute</module>
                    <class>Mage_Catalog_Model_Resource_Setup</class>
                </setup>
                <connection>
                    <use>core_setup</use>
                </connection>
            </add_category_attribute>
            <add_category_attribute_write>
                <connection>
                    <use>core_write</use>
                </connection>
            </add_category_attribute_write>
            <add_category_attribute_read>
                <connection>
                    <use>core_read</use>
                </connection>
            </add_category_attribute_read>
        </resources>
    </global>
</config>
As you can see, configuration file is not large, there are two nodes only: module version and resources for install script. Install script helps us to create a new attribute. In the node <resources> we defined the class for our install script which will be used for the extension. Working with methods of this class helps to create, update, remove attribute (etc). And the node <add_category_attribute> says that script must be located in the folder with the same name (in our case path will be ‘app/code/community/Atwix/CustomCategoryAttribute/sql/add_category_attribute’)
Step 3. Create attribute.
Another important thing is to create install script file in the folder ‘add_category_attribute’, and the file name depends on the module version, so it looks like ‘mysql4-install-x.x.x.php’, where x.x.x is the version of the module.
mysql4-install-0.0.1.php
<?php
$this->startSetup();
$this->addAttribute(Mage_Catalog_Model_Category::ENTITY, 'custom_attribute', array(
    'group'         => 'General Information',
    'input'         => 'textarea',
    'type'          => 'text',
    'label'         => 'Custom attribute',
    'backend'       => '',
    'visible'       => true,
    'required'      => false,
    'visible_on_front' => true,
    'global'        => Mage_Catalog_Model_Resource_Eav_Attribute::SCOPE_STORE,
));

$this->endSetup();
As a result, we created a new attribute in the category with label ‘Custom attribute ‘. This attribute is a text area and it must be visible on the frontend. Check this out!
Step 4. Check result.
Here, let’s clear cache and after this, go to Manage Categories – in ‘General Information’ tab you will see a new attribute: ‘Custom attribute’.

Moreover, to see the content from ‘Custom attribute’ on the frontend in the category page – you need to perform some Magento theme development. You need to use the helper for reading attribute in the template of this page (‘app/design/frontend/<package> /<theme>/template/catalog/category/view.phtml’), check please the following code:
...
<?php if($_customAttribute = $this->getCurrentCategory()->getCustomAttribute()): ?>
    <?php echo $_helper->categoryAttribute($_category, $_customAttribute, 'custom_attribute') ?>
<?php endif; ?>
...
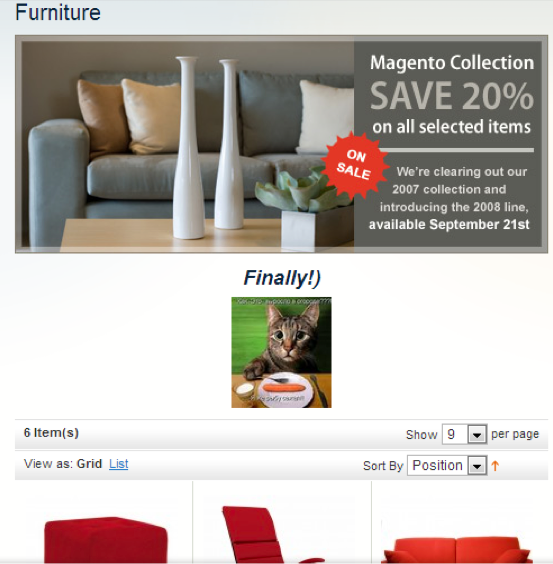
As this code was put before ‘product list’ output, so after refreshing a page we will see the result:

Following all these steps, it will be great to enable wysiwyg editor for a new attribute, that will give us an opportunity to place different content with an inline styles in simple way.
Step 5. Update attribute.
For each version of the module, it is also possible to have upgraded scripts which filenames are of the form mysql4-upgrade-0.0.1-0.0.2.php. It seems to be the best solution to update the attribute.
mysql4-upgrade-0.0.1-0.0.2.php
<?php
$this->startSetup();
$this->addAttribute(Mage_Catalog_Model_Category::ENTITY, 'custom_attribute', array(
    'group'         => 'General Information',
    'input'         => 'textarea',
    'type'          => 'text',
    'label'         => 'Custom attribute',
    'backend'       => '',
    'visible'       => true,
    'required'      => false,
    'wysiwyg_enabled' => true,
    'visible_on_front' => true,
    'is_html_allowed_on_front' => true,
    'global'        => Mage_Catalog_Model_Resource_Eav_Attribute::SCOPE_STORE,
));

$this->endSetup();
As well, method addAttribute can not only create, but also update the attribute – that’s why, you may also use method updateAttribute.
Step 6. Check updated result.
At last, we clear cache and see the button ‘ WYSIWYG Editor ‘ near ‘Custom attribute’. Also, it is necessary to use editor to change the content in this attribute, insert some image, format text and at the end – to save the changes. After all, you should refresh category page and see the result:

We hope this article will help you to work with Magento development. Thanks for reading!
You may also want to read:
