Scheduled background processes are important in any large system. Clean ups and keeping cache and indexes up to date allow to keep your system healthy, while some processes are simply need to be stretched in time in order to avoid high system load, memory leaks or certain services overload (massive emails sending). Setting up a cron job for such processes and for the processes that should be repeated from time to time is always a good idea. In this blog post we will describe how to set a certain part of code as a cron job in Magento 2.
Let’s create file, which contains the code we need to execute. It could be called whatever you want and placed anywhere within your extension. But it will look more neat if you put it in “Cron” directory of your extension. It should look like this:
<?php
/**
 * path:
 * magento2_location/app/code/Vendorname/Extensionname/Cron/MyCronTask.php
 */

namespace Vendorname\Extensionname\Cron;

class MyCronTask
{
    public function execute()
    {
        /**
         * 	Do some cool stuff here
         */

        return $this;
    }
}
It is recommended to use a separate class and put your logic to the execute() method simillary to Magento2 controllers – one action per one cron file.
Next, we need to add a configuration file, which lets Magento2 know where to call which cron task:
<?xml version="1.0"?>
<!--
/**
 * path:
 * magento2_location/app/code/Vendorname/Extensionname/etc/crontab.xml
 */
-->
<config xmlns:xsi="http://www.w3.org/2001/XMLSchema-instance" xsi:noNamespaceSchemaLocation="urn:magento:module:Magento_Cron:etc/crontab.xsd">
    <group id="custom_group_name">
        <job name="my_cronjob_name" instance="Vendorname\Extensionname\Cron\MyCronTask" method="execute">
            <schedule>* * * * *</schedule>
        </job>
    </group>
</config>
Let’s check crontab.xml params in detail. Node “job” has 3 params here:
- name – the unique identifier of the cronjob. Will appear as a “job_code” in the “cron_schedule” database table of magento installation;
- instance – class that should be instantiated;
- method – method of the class instance that should be called.
“schedule” node has a cron expression, which specifies the time our cron job should be scheduled for. Our example expression states that it should be called anytime.
Node “group” specifies the group of the cron tasks, which our cronjob should belong to. We need to specify it too, if wee need to have a custom group. Magento 2 cron has only groups “default” and “index” from the box. In order to create our own group we need to declare it with another config file. It is called cron_groups.xml and should have the following content:
<?xml version="1.0"?>
<!--
/**
 * path:
 * magento2_location/app/code/Vendorname/Extensionname/etc/cron_groups.xml
 */
-->
<config xmlns:xsi="http://www.w3.org/2001/XMLSchema-instance" xsi:noNamespaceSchemaLocation="urn:magento:module:Magento_Cron:etc/cron_groups.xsd">
    <group id="custom_group_name">
        <schedule_generate_every>1</schedule_generate_every>
        <schedule_ahead_for>4</schedule_ahead_for>
        <schedule_lifetime>2</schedule_lifetime>
        <history_cleanup_every>10</history_cleanup_every>
        <history_success_lifetime>60</history_success_lifetime>
        <history_failure_lifetime>600</history_failure_lifetime>
        <use_separate_process>1</use_separate_process>
    </group>
</config>
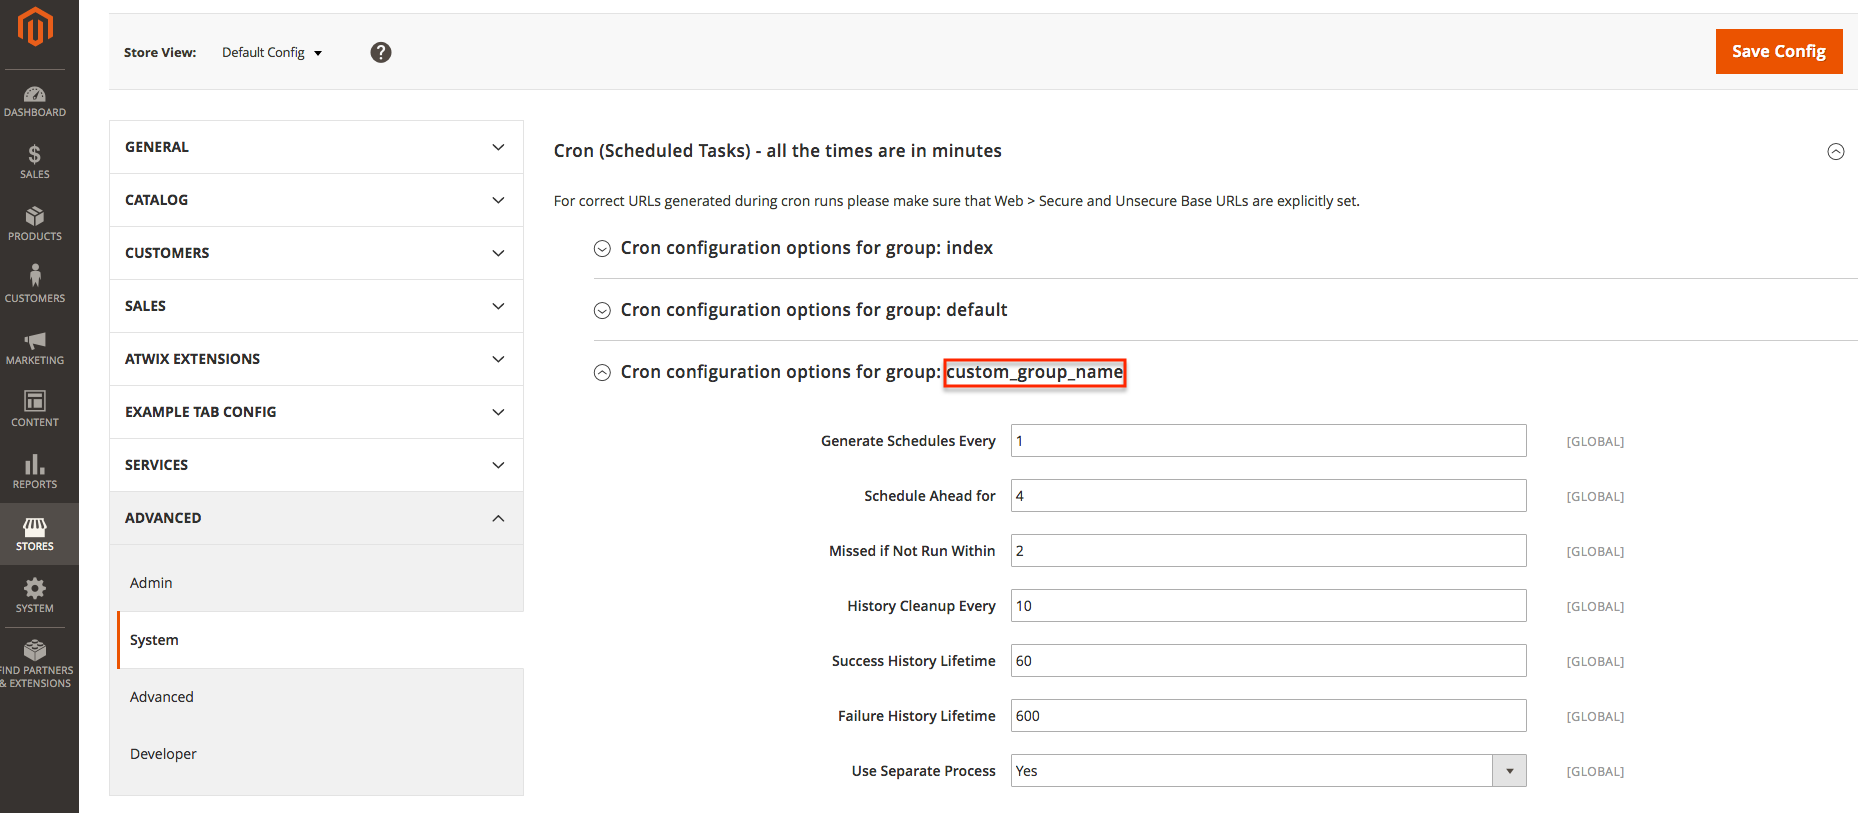
Creating separate groups for the cronjobs allows you to specify the period of tasks scheduling and persisting cronjobs execution history. Params, specified in cron_groups.xml are set as default for this group and may be changed from “Stores > Configuration > Advanced > System > Cron (Scheduled Tasks) – all the times are in minutes”. If you check the admin panel, you should see the new group of cron jobs:
At last, you may try to schedule and run your cronjobs manually via bash shell from the magento root directory and for your custom cronjobs group only:
bin/magento cron:run --group="custom_group_name"
That’s all. I hope that this article was useful and will save you some time. Thanks for reading!

