Magento 2 message queue is a great feature introduced in new version of the platform.
The goal of this article is to show practical example on how to publish (send) message to the queue and consume (receive and process) it.
Magento supports MySql and RabbitMQ based message queues. In the example, described in this article, we are going to use Magento 2 RabbitMQ.
Let’s start with installing RabbitMQ server. On systems similar to Ubuntu, it can be accomplished with a single command:
sudo apt install -y rabbitmq-server
Additionally, we enable rabbitmq_management Magento 2 plugin to get WEB interface for monitoring queues:
rabbitmq-plugins enable rabbitmq_management
Navigate to http://127.0.0.1:15672/ and enter default login/pass: guest/guest. If you use a remote server or docker container you can create a ssh tunnel to access this page from your local machine:
ssh -L 15672:localhost:15672 user@remote.host
We have completed the server setup. Let’s begin the coding part. Create a module. In this sample, we use Atwix_Queue namespace. Our goal will be to send a message to the queue on product delete and then listen to this queue, receive (consume) message and log it to the file.
First, we define the exchange, topic, queue, publisher, and consumer. As you may guess such configuration should be done in XML files (taken from official Magento message queues guide):
- communication.xml – Defines aspects of the message queue system that all communication types have in common.
- queue_consumer.xml – Defines the relationship between an existing queue and its consumer.
- queue_topology.xml – Defines the message routing rules and declares queues and exchanges.
- queue_publisher.xml – Defines the exchange where a topic is published.
Let’s start with communication.xml and define topic atwix.product.delete:
<config xmlns:xsi="http://www.w3.org/2001/XMLSchema-instance" xsi:noNamespaceSchemaLocation="urn:magento:framework:Communication/etc/communication.xsd">
    <topic name="atwix.product.delete" request="Magento\Catalog\Api\Data\ProductInterface"/>
</config>
Also, we specify data type of the topic in request attribute:Magento\Catalog\Api\Data\ProductInterface.
Then in queue_topology.xml define atwix.product exchange and bind AtwixProductDelete to route atwix.product.delete topic to atwix_product_delete queue:
<config xmlns:xsi="http://www.w3.org/2001/XMLSchema-instance" xsi:noNamespaceSchemaLocation="urn:magento:framework-message-queue:etc/topology.xsd">
    <exchange name="atwix.product" type="topic" connection="amqp">
        <binding id="AtwixProductDelete" topic="atwix.product.delete" destinationType="queue" destination="atwix_product_delete"/>
    </exchange>
</config>
Note connection type amqp in the file above.
queue_publisher.xml is simple. No publisher classes are specified here:
<config xmlns:xsi="http://www.w3.org/2001/XMLSchema-instance" xsi:noNamespaceSchemaLocation="urn:magento:framework-message-queue:etc/publisher.xsd">
    <publisher topic="atwix.product.delete">
        <connection name="amqp" exchange="atwix.product" />
    </publisher>
</config>
In queue_consumer.xml we define consumer and specify class and method that processes message i.e. handler:
<config xmlns:xsi="http://www.w3.org/2001/XMLSchema-instance" xsi:noNamespaceSchemaLocation="urn:magento:framework-message-queue:etc/consumer.xsd">
    <consumer name="AtwixProductDelete" queue="atwix_product_delete" connection="amqp" handler="Atwix\Queue\Model\Product\DeleteConsumer::processMessage"/>
</config>
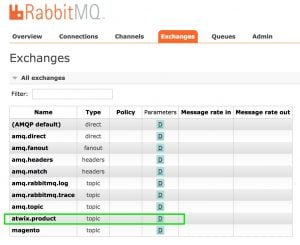
We are done with configuration. If everything is defined right after running bin/magento setup:upgrade we should have exchange and queue created on RabbitMQ server:

Let’s continue with creating publisher class. It is \Atwix\Queue\Model\Product\DeletePublisher. Here we need to specify topic name as a constant and declare method that will publish a message to the queue.
class DeletePublisher
{
    const TOPIC_NAME = 'atwix.product.delete';

    /**
     * @var \Magento\Framework\MessageQueue\PublisherInterface
     */
    private $publisher;

    /**
     * @param \Magento\Framework\MessageQueue\PublisherInterface $publisher
     */
    public function __construct(\Magento\Framework\MessageQueue\PublisherInterface $publisher)
    {
        $this->publisher = $publisher;
    }

    /**
     * {@inheritdoc}
     */
    public function execute(\Magento\Catalog\Api\Data\ProductInterface $product)
    {
        $this->publisher->publish(self::TOPIC_NAME, $product);
    }
}
Product object will be automatically encoded to JSON.
Next create a plugin where we track product delete event and call execute method of publisher:
class ProductDeletePlugin
{
    /**
     * @var \Magento\Quote\Model\Product\QuoteItemsCleanerInterface
     */
    private $productDeletePublisher;

    /**
     * @param \Magento\Quote\Model\Product\QuoteItemsCleanerInterface $quoteItemsCleaner
     */
    public function __construct(DeletePublisher $productDeletePublisher)
    {
        $this->productDeletePublisher = $productDeletePublisher;
    }

    /**
     * @param ProductResource $subject
     * @param ProductResource $result
     * @param \Magento\Catalog\Api\Data\ProductInterface $product
     * @return ProductResource
     * @SuppressWarnings(PHPMD.UnusedFormalParameter)
     */
    public function afterDelete(
        ProductResource $subject,
        ProductResource $result,
        \Magento\Catalog\Api\Data\ProductInterface $product
    ) {
        $this->productDeletePublisher->execute($product);
        return $result;
    }
}
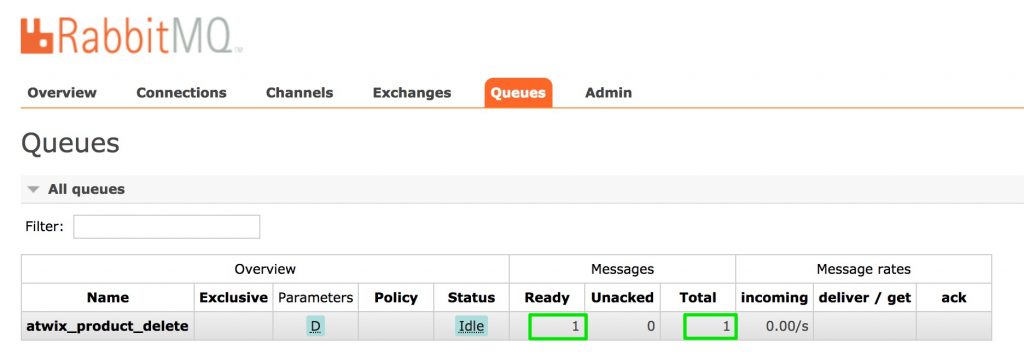
We should be good with publisher part. Delete a product and check if message has been sent to the queue:

On the screenshot above you can see that there is one message in the queue. Let’s try consume it.
Create handler that we specified in queue_consumer.xml:
class DeleteConsumer
{
    /**
     * @var \Zend\Log\Logger
     */
    private $logger;

    /**
     * @var string
     */
    private $logFileName = 'product-delete-consumer.log';

    /**
     * @var \Magento\Framework\App\Filesystem\DirectoryList
     */
    private $directoryList;

    /**
     * DeleteConsumer constructor.
     * @param \Magento\Framework\App\Filesystem\DirectoryList $directoryList
     * @throws \Magento\Framework\Exception\FileSystemException
     */
    public function __construct(
        \Magento\Framework\App\Filesystem\DirectoryList $directoryList
    ) {
        $this->directoryList = $directoryList;
        $logDir = $directoryList->getPath('log');
        $writer = new \Zend\Log\Writer\Stream($logDir . DIRECTORY_SEPARATOR . $this->logFileName);
        $logger = new \Zend\Log\Logger();
        $logger->addWriter($writer);
        $this->logger = $logger;
    }

    /**
     * @param \Magento\Catalog\Api\Data\ProductInterface $product
     * @throws \Magento\Framework\Exception\LocalizedException
     * @return void
     */
    public function processMessage(\Magento\Catalog\Api\Data\ProductInterface $product)
    {
        $this->logger->info($product->getId() . ' ' . $product->getSku());
    }
}
From the code above you can see that processMessage method expects instance of \Magento\Catalog\Api\Data\ProductInterface as parameter.
The last step is to start our consumer with command:
bin/magento queue:consumers:start AtwixProductDelete
As a result in RabbitMQ management web interface you should see that message has been consumed and as proof of that product-delete-consumer.log should contain a record with product id and sku.
You can find the complete module code on Github.
